Showing posts with label filipino food. Show all posts

Friday, July 3, 2015

HIRO ASIAN KITCHEN FEATURES SKIP TO MALOU SIGNATURE DISHES

I've been enjoying all the culinary opportunities that STL has to offer.

The latest gig is being featured in Hiro Asian Kitchen .  Starting on July 7, Skip to Malou's signature dishes will be featured every dinner on Tuesday and Wednesday along side their scrumptious regular menu of Hiro.

I met Chef Bernie Lee,  Executive Chef owner  of Hiro Asian Kitchen a few weeks ago when I attended his first pop up dinner in a hip furniture shop called Hammer and Hand.  I immediately fell in love with Bernie.  We share the same passion about our food.  Staying true to the traditional flavors but modern in presentation and approach.

After a few days, our paths crossed again, (as in literally we bumped into each other while I was walking around the park looking at Antiques on display).  He invited me for lunch one afternoon and over a round of cocktails and burgers we agreed to do a collaboration within a few weeks.


We are thrilled that the media is excited about our collaboration.  We were invited by Kim Hudson, one of the hosts of the 9AM News on Fox2 to talk more about our event.

Here's the clip of that wonderful guesting that we did. I hope to see you there:
                                       HIRO's ASIAN KITCHEN
                                       1405 WASHINGTON AVE.
                                       St. Louis, MO
                                       EVERY TUESDAY AND WEDNESDAY (DINNER)


Thursday, June 4, 2015

SHOW ME ST LOUIS TV STINT and a Pop Up

Can someone please tell me I'm not dreaming?

Ok fine,  let me breathe... but yes today, I was  on SHOW ME ST. LOUIS! I'm stoked being with  the host and STL's favorite Ms. Heidi Glaus.


Alright please forgive me for  posting this picture.  (In our defense the lights were off when this photo was taken) I just needed to put it out there that working with Heidi makes you feel like you are a pro in front of the TV camera.  The truth is she made the whole experience fun and easy, that I totally forgot I was on cam!  Seriously Heidi, thank you so much for this wonderful experience.  And of course to the whole crew of Show Me St. Louis (even up to the Security Guard haha!).


SO I was on Show Me St. Louis to share some of the plates I will be serving at my next pop-up,  Did I say another POP-UP?  Oh ok, sorry for not updating you guys on what's going on but yes, I have another pop-up this coming June 27 at Hammer and Hand Imports.   Hammer and Hand is a hip furniture shop owned by Chris and Amy.  They've been hosting one of a kind pop-up dinners at their store lately.  It was serendipitous that one day, I just dropped by their store and voila, here I am schedule to do another pop up at their venue.   I am also collaborating with another couple, Carlos and Val, owners of 2340 Kitchen Mobile Services.  We've been  neighbors all these years but I'm excited to know them closely as we work together for this upcoming event.

Ok fine, here's the link of my SHOW ME ST. LOUIS stint .  But before you click that, if  you want to reserve for the pop-up, I suggest you do so because space is limited. Click the button to reserve. Eventbrite - SKIP TO MALOU | Cooking with a Filipino Accent (A Pop Up Brunch)

See you soon!

Wednesday, July 10, 2013

Chicago Weekend | Ensaladang Talong con Lechon Kawali ala Bonni (Eggplant Salad with Crispy Pork Belly)


Chicago has become one of our favorite cities.  

Luckily, it's a short drive from St. Louis so a weekend in Chicago is a welcome respite.  I thought of sharing some pictures I took during our last trip... so here it goes:


Oprah's Lake Point Tower, is an iconic building located by Lake Michigan in downtown Chicago. You can't miss it especially if you are at the Navy Pier (a popular tourist destination) It looks like a giant perfume bottle haha, but it has become our "inside joke" among friends that this is our next residence- NOT, lol!


Chicago skyline is a beautiful site to behold... don't you think?

It was a lovely day, so riding the Water Taxi was a lot of fun.


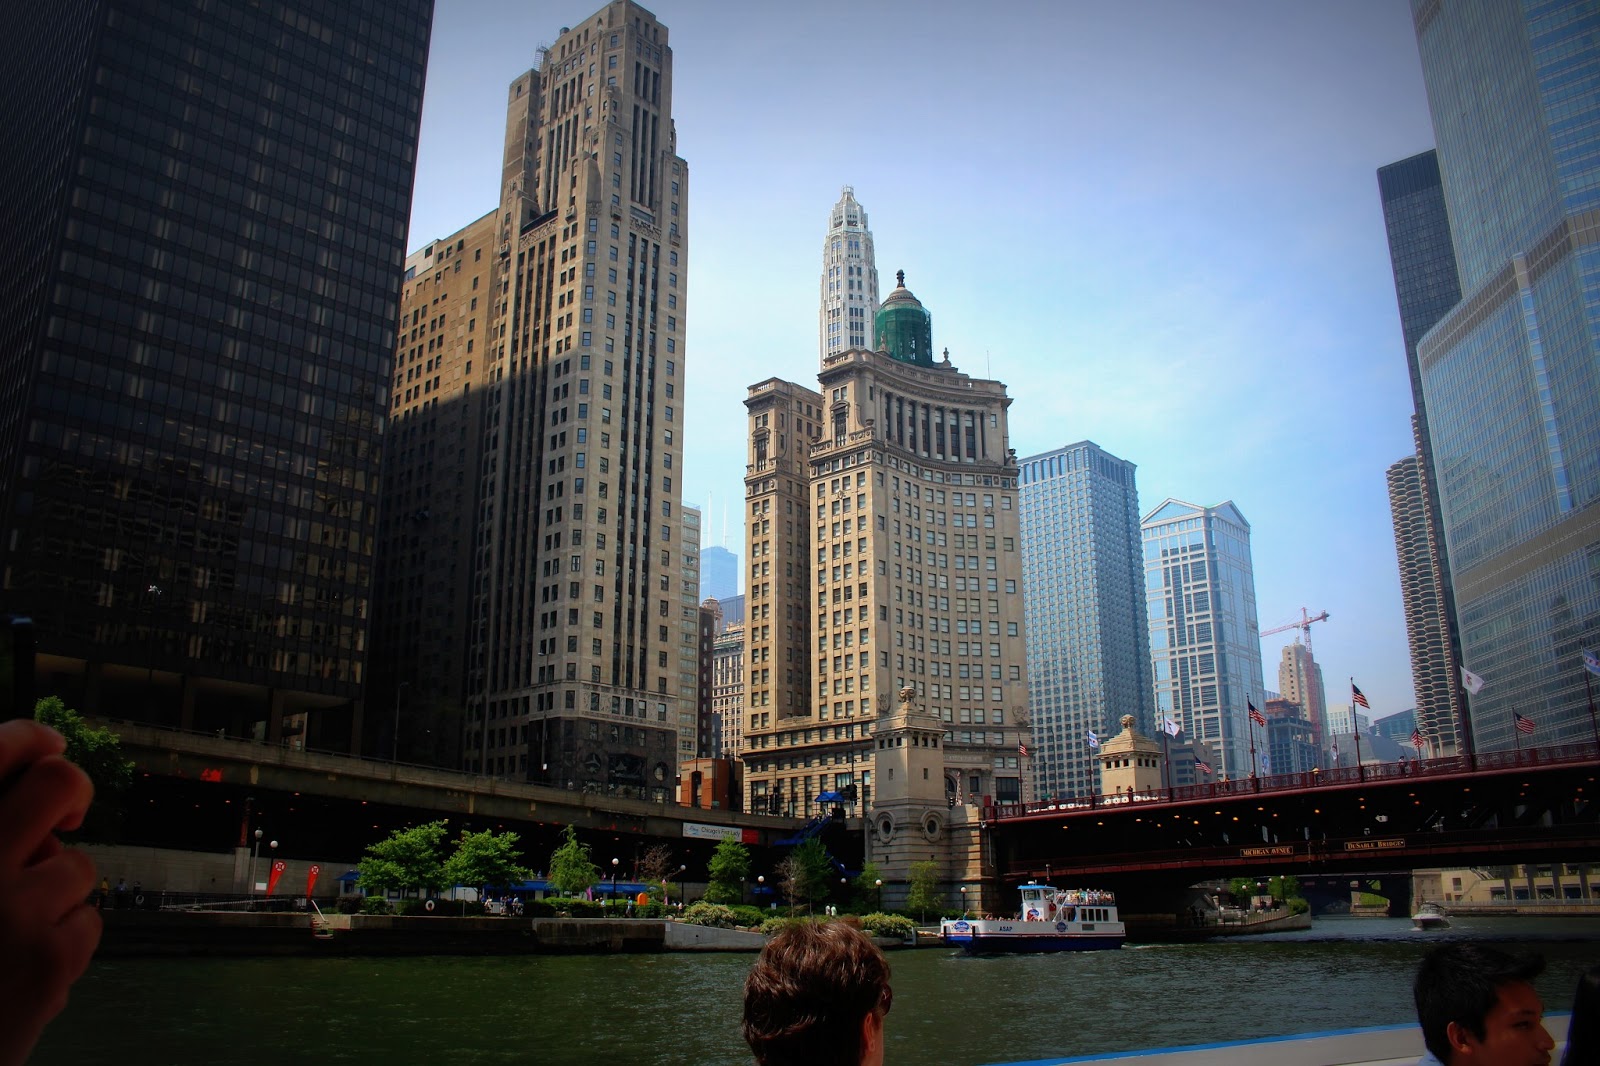
The center building is Trump Tower.  Remember Bill Rancic?  He is the first winner of The Apprectice and he managed the construction of the tower.


Luckily we had our friend Bonni with us who served as our tour guide.
"The middle structure is the Wrigley Building at Michigan Avenue.  The Wrigley building was modeled after the Giralda tower of  the Cathedral in Seville.  The Wrigley Building  once served as the headquarters of the Wrigley company" he says.


This is the Marina City Complex, says Bonni again.  The two cylindrical towers by Chicago River has a unique shape, the towers are locally known as the corn cobs."


We were there on a Sunday, so were pleased that The Union Station was not as crowded.

We know that Chicago has a dynamic food scene but for now, let me share with you one of  the dishes that our host prepared.


Yep, this is Eggplant Ensalada con Lechon Kawali (Eggplant Salad with Crispy Pork Belly), knocked my socks off.  The pungent taste of bagoong (shrimp paste) plus the soft and rustic flavors of the grilled eggplant and the decadent crispy pork belly got me.  With Bonni's permission I would like to share the recipe with you.

 Eggplant Ensalada con Lechon Kawali ala Bonni (Eggplant Salad with Crispy Pork Belly)

Ingredients:
Lechon Kawali (chopped into bite size)  Get Lechon Kawali recipe here.
2 medium eggplant (grilled and charred skin removed)
2 medium tomatoes, sliced
1 medium onion, sliced
2 tbsp bagoong alamang (shrimp paste)


Procedure:
Put the grilled eggplant on the bottom of a serving dish.
Then layer it with the chopped crispy pork belly.
Meanwhile, saute the onions and tomatoes.  Quickly, add the shrimp paste.  Toss additional tomatoes (Bonni said, you want the tomatoes to be crisp and not mushy).
Pour the sauted tomatoes on top of the dish.  Toss them altogether.
Serve immediately while the pork belly is still crispy.  Enjoy!


And oh, lastly, this is  Cloud Gate also known as The Bean.   It is an amazing piece of art located at the Millenium Park.  Initially I thought it looked like a helmet (I actually called it The Helmet--haha).  


It's whimsical... magical...

Yes it's a silver bean sculpture which has become a popular tourist destination.  If you make it to Chicago, it's a fun (and free) thrill.  Enjoy!

And again, Bonni, thank you for the recipe.  You and Priscilla are awesome hosts... til next time!


Wednesday, April 3, 2013

Spring Fling | Lumpiang Hubad (No Wrap Spring Rolls)


I feel like having a Spring Fling.

OK, calm down now, I was referring to the weather. Spring has remained elusive... well, especially here in St. Louis and in most parts of the East Coast. But this morning, the gentle warmth of the sun touching my skin made me instantly fall in love with the season.  It's about time to park those winter layers inside the closet... put away those boots... and yes let the song "Here comes the sun..." get stuck in your head.

Along with getting rid of the layers of clothing, maybe it's also a good time to get our bad habits out the window and say... "I'm ready for a fresh start!"

Lately, I've been challenging myself to eat healthy.  And it feels good to be in that zone.  Nope I'm not even saying the dreaded words ("I'm on a diet") but keeping a healthy option is what I go with.

So for today, I share a classic Filipino dish called Lumpiang Hubad (or Spring Roll sans the wrapper). Filipinos have different kinds of lumpia (spring rolls), the most popular one is called Lumpiang Shanghai. It is filled with pork rolled in a thin wrapper and deep fried.  But the healthier version is what we call Lumpiang Sariwa (or Fresh Lumpia). The word "fresh" means it's not fried. It is made mostly of vegetables and rolled in a thin crepe that is soft and refreshing to the palette. But this recipe calls for no wrap or spring rolls.  Sorry I find it hard to directly translate the name of this dish.  Hubad in Filipino means Naked in English... so it doesn't sound right to call it Naked Spring Rolls haha.. But before I confuse you any further with my Spring Fling, here's the recipe.


Lumpiang Hubad (No Wrap Veggies)

1 chicken breast julliened
1/4 lb shrimp, deveined and julliened
1/2 medium sized cabbage, sliced into strips
2 medium carrots, sliced into strips
1 medium singkamas, sliced into strips
1 c green beans, julliened 
4 pcs garlic, minced
2 tbsp olive oil
2 tbsp oyster sauce
salt and pepper to taste
1/2 tsp annatto powder (optional)

In a cooking pan, saute onions and garlic with olive oil. Mix in annatto powder, give it a quick stir. Add chicken slices. Saute for five minutes, stirring frequently. Add shrimp and give it a quick stir.  After about 4 minutes add in all sliced vegetables and season with oyster sauce, salt and pepper to taste. Stir and cook for about 5 minutes or until done. 


For the peanut sauce 

1/2 cup of light soy sauce
1 tbsp sugar (you could adjust it accordingly)
2 tbsp peanut butter
1/2 cup water
1/4 c cornstarch dispersed in water (make sure to have no lumps)
2 cloves garlic, minced
1/4 c peanut, crushed

Directions: 
Mix all the ingredients together : soy sauce, water peanut butter and sugar into a saucepan. When boiling, add the cornstarch mixture, stirring continuously to avoid lumps. Remove from heat when the sauce begins to thicken.

Garnish with crushed peanuts and minced garlic.


Saturday, February 16, 2013

Filipino Comfort Food 101 | Kare Kare (Oxtail and Tripe Stew in Peanut Sauce)

The plethora of food diaries seen in blogs, magazines and even TV shows, has opened the door to a more accepting food culture.  It is now fashionable to try something different. What was deemed intimidating is now called fresh, bold and ground-breaking.  Anthony Bourdain was way ahead of his time.  From dining at a sushi bar to feasting on prime rib steaks, it is now cool to enjoy good food.  Food is no longer taken just for nourishment, food is now savored, talked about and even watched by millions on TV.  Who would have thunk?

For today's dish, I hope you still keep an open mind.  For us Filipinos, kare-kare holds a very special place in our foodscape.  It is usually served as part of our "special" dinner spread - always present in parties and in celebrating special occasions.  Kare-kare tastes better when shared with family and friends.  The classic kare-kare recipe is a stew in peanut sauce with oxtail, beef, vegetables and tripe.  As a dish often prepared for fiestas throughout the country, kare-kare is comfort food for Filipinos living abroad.  

When done exquisitely, it serves as a time machine that brings you back to your hometown as a kid - remembering the fiestas and special events you celebrated with your family.  A bite into the stew brings the peanut sauce front and center followed by the tripe that melts in your mouth What puts you over the edge is the sliver of bagoong (shrimp paste) you add to a spoonful of the stew, as there is no other taste like it.  And there is no place like Home...

Kare-Kare (Oxtail and Tripe Stew in Peanut Sauce)


Ingredients:
2-3 lbs of oxtail cut into pieces (they usually come in packs already cut)
2-3 lbs tripe
1/4 c rice, toasted then pulverized (use Kare kare mix as an alternative)
3- 4 tbsp creamy peanut butter
2 tsp annato powder
2 onions (1 for sauteing, one for tenderizing the meat)
3 cloves garlic, minced
bokchoy
2 pcs eggplant (sliced)
1 bundle string beans (sliced, 3 inch long)

Procedure:
Rub rock salt on the oxtail to clean.  Rinse thoroughly.  On a stockpot, place the oxtail and submerge it with water.  Allow the water to boil.  Discard the water.  Rinse the oxtail and discard the water.  In the same stockpot, submerge the oxtail with water again.  Throw in some bay leaf, peppercorn and celery.  Boil until tender.  You could use the stock later, but make sure to remove the fat that settles on top.

Do the same procedure with the tripe.  Usually the tripe sold here in the US is already white and clean.  But you can still rub salt to clean.  Repeat procedure as you've done with the oxtail. Let it cool and slice the tripe into strips, 2-3 inches long and 0.5 inch wide. Drain the water and set the tripe aside.

Saute garlic and onions until onions get wilted and translucent.  Add annato powder, stir to mix well.  Add oxtail and tripe (make sure they are tender).  Season with salt and pepper.  Stir for about 2 minutes then add beef broth.(3-4 cups).  Let it simmer and cook for 20 minutes or until the broth has been reduced.  Add the pulverized rice (or the kare-kare mix).  This will thicken the sauce, so make sure to keep on stirring. Add peanut butter.  Mix well, taste and season with salt (or shrimp paste) and pepper.

In a separate pot, pour 2 cups of water.  Add a teaspoon of baking powder.  Season with salt.  Drop the veggies and remove after boiling.  Drain excess water.  Add blanched vegetables on the cooked kare kare.  Serve with cooked or bottled shrimp paste on the side.  Enjoy!


This recipe is also available on my YOU TUBE Channel.  Please watch it here:


Friday, October 26, 2012

Reasons | Ukoy (Shrimp Fritter)

Things happen for a reason. 

I've been missing my kids the past few days and I wish they are still home with me. Was it worth it having them all go away for college? I struggle with the thought of what could have been if we all stayed together?  What if we didn't leave the Philippines?  What if I had just asked them to go to school in the same city I'm in?  What if I tried to hold on to them as long as I can?

These questions lingered in me.  Until I visited each of my kids' Facebook account. I go through their recent photos, my eldest daughter had a busy week entertaining a visiting high school friend.  They went around Berkeley and San Francisco and had a blast.  My second daughter had a busy October at school but still manages to attend her pre- health organization's meetings and events at UCLA.  My son in Cornell also has been busy with school work and had a lot of fun with his Filipino-American student organization's event of hosting a comedy workshop.

Finally, I read a conversation among the three of them, with my eldest daughter leading the way, on how they should catch up on Google Hangout.  All three of them promise to update their planners so they can arrange a meeting, hoping to do this bi-monthly.  This thread was so heart-warming for me.  I guess my greatest fear is we are all so busy that we lose connection to each other.  But that connection can no longer be broken.  

No matter how busy our schedules get, how far away we are from each other, we are still the same.  Our connections have been built through all the years we were together.   We started early, raising the kids in an active and creative environment, making sure they played a sport and a musical instrument in elementary school.  It continued by demanding from them the highest grades possible but at the same time asking them to do extracurricular activities.  Getting them involved in research and internships in high school.  And asking them to be the best person they could be when they leave for college.  Things happen for a reason.  My kids are all away from home to get the best education and experience for them to prepare for the future.  And now I am just riding along until I get to be with them again.
___________________________________________________________________


Ukoy (Shrimp Fritter)
Ukoy is a popular street food in the Philippines.  I've been wanting to make this especially at this time of the year when pumpkins are everywhere.  Squash is one of the ingredients and I wanted the streaks of squash to show, but it turned out like it blended with the batter.  My husband said it didn't look like the traditional one, but whatever it is he said, it surely tasted great... LOL!


Ingredients:
1 lb shrimp, deveined
1 cup squash, shredded
1 medium carrot, shredded
2 stalks green onions sliced
(you could also add mongo sprouts or potatoes)
1 egg
1/2 cup flour
1/2 cup cornstarch
1 tsp lemon-pepper powder
3/4 water (pour it slowly, making sure that the batter is still thick)
1/4 tsp baking powder
1/4 tsp baking soda
salt to taste


Procedure
You don't like a soggy shrimp fritter, so I'm sharing a technique which I learned from America's Test Kitchen on PBS. The solution is to dry the ingredients (veggies and shrimp) with a paper towel first and mix them with the dry ingredients.  The dry ingredients absorbs the moisture of the veggies and shrimp.
Mix the dry ingredients first: flour, cornstarch, lemon-pepper powder.  Toss the veggies and shrimp.  This will allow the water to be absorbed by the dry ingredients.

On a separate bowl, whip egg and water together.  Pour it over the dry ingredients and mix well.

Heat cooking oil in a pan.  Scoop about 2 tablespoons of batter.  Quickly drop them in the hot oil.  Cook each sides for about 2 minutes or until golden brown.

Serve with vinegar with pepper and onions but you could also use the sweet chili if you'd prefer.  Enjoy!


Wednesday, September 26, 2012

Surprise Me | Curry Dusted Crispy Chicken and Taters

Surprise me!

These are two words that my husband loves to say, when he calls me from work, and I ask him  "What do you want for dinner?"  It's also code for "make me something special" or "I would like to grab some beer and watch the game before dinner." And if you have been married like me for almost 25 years, you know how to read those cryptic messages like clues written in an easy crossword puzzle.

When I hear these words, I dart to my kitchen, and tweak the original plan of what's for dinner.  Just like tonight, I was going to make Chicken Curry, but his statement "surprise me" challenges me to make something "fun".  Something out of the ordinary yet recognizable.


"Hmm  deconstructed chicken curry?"  he infers while nibbling his first bite.

"You recognize the flavors" I triumphantly replied.

And you bet when I saw the tapping of his fingers and nodding of the head... these were clear signals that I succeeded in bringing something new to our dinner table. Enjoy!

Curry Dusted Crispy Chicken and Taters

Ingredients:
6 pcs chicken thigh fillets (you may use chicken breast)

2 medium potatoes, quartered
1 medium carrots, sliced
Salt and pepper to taste

For breading:

1 c flour
salt &pepper
2 tbsp curry powder  (well adjust this according to your preference)
salt and pepper to taste

Season chicken fillets, potatoes and carrots with salt and pepper. Set aside

Fill a large skillet (cast iron is best) about half full with vegetable oil. Heat the oil at 325 degrees F. Meanwhile, roll the chicken pieces into the breading. Shake off excess flour. Drop 5-6 pieces into the hot oil. Make sure there's enough space to stir the chicken. Deep fry it until golden brown. Drain the fried chicken. It should be crispy goden brown.

Repeat the above procedure for the potatoes and carrots.

For the gravy:

1 tbsps. cooking oil
1 cloves of garlic
1 small onions, chopped
1 medium tomatoes, sliced
1/4 c chicken stock
1-2 tbsps curry powder
salt and pepper to taste
1 c coconut milk
1/2 inch ginger/garlic paste


In a pan, saute onions until golden brown.  Add tomatoes  and saute until oil separates. Add ginger-garlic paste and stir.  Spice up using the curry powder; I like to make my curry rich and flavorful so I used around 1 1/2 table spoons.  You may want to add 1 table spoon first and adjust according to your taste. Add coconut milk and let it boil and util ir's reduced. Add coriander leaves. Season with salt. The sauce shoud be thick and creamy.


To add more "fun", I sliced the chicken fillets and skewered them in a bamboo stick.


Thursday, September 13, 2012

Pinakbet Experiment: Pinakbet Galette (Vegetable Galette)

I was invited to audit a short pastry class at Kitchen Conservatory a few weeks ago, and since then, I've been wanting to give my pastry making skill a try.  "Cold dough + hot oven = flaky pastry" said Anne, as the chef/owner/instructor's words ran in my head for days.

One of the recipes we made is Caramelized Tomato Tart and the savory tart left an indelible print in my taste buds.  The vinegar in the recipe reminded me of a vegetable stew that is an iconic dish in any Filipino home.  The veggie dish is called pinakbet.

Later that week, a cousin of mine, Erick, shared a pic of Pinakbet Pizza.   And this picture plus the pastry making class gave me an A-HA moment. 

I want to make a Pinakbet Galette, came the idea.  

I played with the flavors of the traditional pinakbet and used it as a filling for a galette.  I selected to make a galette because it's not as intimidating as making a beautiful, but dangerous to make (as in easy to fail), savory pie.  I blame Martha Stewart for making picture perfect pies, now I'm afraid to even try!  But making galettes is fun... as it is more forgiving.  It gives you a free hand on how to form your crust.  

Pinakbet Galette may sound novel, or even bizarre to some.  But before you raise those eyebrows, why not give it a try.  Taste it and tell me how you like or dislike it.  We'll have fun... trying something new.. and make our own take on combining an iconic Filipino vegetable dish with some pastry goodness.

Pinakbet Galette


Pinakbet Galette (Vegetable Galette)

Ingredients;

Crust:
1 1/4 cup flour
1 1/2 teaspoon sugar
1/2 teaspoon salt
2 cloves garlic, minced
1 stick butter
1 egg
cold water (pour tbsp of water at a time)

Filling
3 cloves garlic, minced
2 large onions
3 large tomatoes, chopped
2 tbsp olive oil
4 tbsp butter
1/4 c vinegar
1 tbsp sauteed shrimp paste (bagoong alamang)
1/2 lb ground pork

Topping:
1 large eggplant, thinly sliced
3 pcs. okra thinly sliced
1 large tomatoes, thinly sliced
1/4 medium squash, peeled, seeded and thinly sliced
olive oil
salt and pepper

Procedure:
Pre-heat oven for 350 degrees.
Crust:
Mix together the flour, sugar and salt.  Add the butter cubes and mix it together.  Add in the eggs and form a ball.  Pour a little water if the dough is not holding together.  (note: water should be ice cold and pour just a little like a spoonful) Refrigerate for at least 30 minutes.

Filling
In a saute pan, pour olive oil, butter, onions (put them altogether to avoid burning.  The onions and garlic will be cooking while the butter is being melted). Cook for about 5 minutes until the onions become translucent. Add tomatoes.  Cook for about 5 minutes or until the tomatoes become mushy. Add shrimp paste and vinegar.  Add pork and cook for 10 minutes, stirring continuously to avoid burning.  Add olive oil if necessary.  Set aside.

Topping:
Slice all veggies and drizzle olive oil.

Roll out the dough in a slightly flour coated surface.  Form a 12 inch diameter circle. Slowly lift it up and put it on a baking sheet.
Spread half of the filling onto the bottom layer.  Layer it with all the veggies.  Add the remaining filling and layer the remaining veggies. Fold the dough around the filling.  Coat the outer layer with egg wash.  Bake for about 30 minutes or until the dough turns golden brown. Remove from the oven and let it cool.


Thursday, August 16, 2012

Video Blog 1 | How to Make Fried Chicken Ala Jollibee

I'm on my way over there with my camera and ready to shoot our first video.

My girlfriend Kelly cheerfully announced.  No. I'm Not Ready, was my immediate retort.  Well girl, just look at it as if you will just be cooking for tonight's dinner.  You could do it.  

You could do it!  Four powerful words that sparked enthusiasm and excitement.  Before I knew it, I was giggling with her, in front of the camera like we were just having fun.  And this my friends is what I would like to present to you... my first collaborative work with Kelly.


Thank you Kelly for the encouragement, the tips, and for shooting this video blog.  And as I mentioned in my May 29 post... Thank you for being a friend. 


Thank you for watching.  Let me know what you think.  xo, Malou P.S. I have shared the recipe of Fried Chicken a la Jollibee in a previous post.  I hope you don't mind if I'll just direct you there to get the whole recipe.  Please click here.


Sunday, April 29, 2012

simple pleasures


Simple pleasures... 

These are the moments when you least expect it and it makes you feel special. So I was on our veranda  that morning with the tropical summer breeze cooling me down. I saw this street vendor hawking buko (coconut), aimlessly driving his bike carrying a wagon-full of buko.  Unlike Lance Armstrong, the vendor pedals his bike like he has no worries in the world.  And this is what I like about my hometown - it is so laid back. Amidst the chaos in the streets and the cacophany from the cars and tricycles around, the site of this man was novel.  


It created a subtle curiosity in me on how to buy from a street vendor.  So I waved my arm and called him like one would hail a cab.  And there he was..

I asked him if I could take pictures and he began to smile...
"Is this for a magazine?" he asked
"No it's for my blog" I said.


So he prepared the buko...


Popped the neon green straws, and voila, you definitely can't beat the freshness...


and the first sip was sheer delight....


It was even better when it was used to cook a pot of chicken soup ..as it added a sweet note to the dish!


So let me share with you the recipe that Lani served us in one of our meals.  Enjoy!

Tinolang Manok sa Buko (Chicken soup in Coconut Juice)

Ingredients:
2 lbs chicken breast, sliced in strips
3 slices of ginger (crushed)
1 medium onion (chopped)
3 cloves of garlic(chopped)
3 cups coconut juice (note: this is different from coconut milk)
2 tbsp cooking oil
1 cup coconut meat, sliced in strips
2 pcs. chayote, slice
2 pcs. carrots sliced
Fish sauce (patis) to taste

Procedure:
In a heavy skillet, saute garlic and onions in oil.  Give it a quick stir.  Wait until the garlic and onions starts to soften and a fragrant smell wafts across the room.  Stir in the ginger.  Quick stir again and add the chicken cut ups.  Allow the chicken to cook for 4-5 minutes.  Pour in the coconut juice.  Let it simmer.  Add the vegetables and allow it to cook until tender.  Season with fish salt.  Add coconut strips and voila you are ready to enjoy the pleasure of slurping and tasting the tender goodness of the chicken and the coconut meat.


Friday, April 20, 2012

Crispy Pork Belly Soured in Tahitian Gooseberry

I love being with my Mama.

I remember putting my arms around her soft shoulder and tightly squeezing  as we weave our way around town. To wake up next to her in the morning was like a dream.  To get a glimpse of her daily routine... praying bead after bead of her rosary... to see her stay true to her promise to my Papa even beyond "through death do us part".  I'm glad that after living abroad for the past 13 years  I was lucky enough to stay with her for 3 weeks - which was oh so precious...and 'twas truly a gift.

 I am sure she loved those moments too.

The other day while I talked to her over the phone, she conveyed  to me how much she misses me especially my cooking.


"Martha (her cook) is back to cooking adobo again" she said in between giggles.

"What??? It's barely a week after I left and she's back to adobo?  I  purposely used local ingredients for her to easily re-create the dishes".  I said.


Oh she tried but her Crispy Sinigang sa Bangkiling (Crispy Pork Belly Soured in Tahitian Gooseberry) didn't turn out to be like yours.  


"Ok, let me post it so she'll recall my instructions". I told her

So for that purpose let me share with you one of my Mama's favorite dishes that I created for her while I was on vacation. But first let me discuss with you what gooseberry is all about.

So who's ready to pucker up? haha!


My mom was so excited to bring home Karamay for me from the market that day. Karamay is how we Ibanags call the little tiny yellow fruit almost the size of a blueberry. But don't let its size and radiant color fool you.  This fruit is really sour. Since I didn't know the English nor the Tagalog term for it, I posted it on my Facebook wall for my FB peeps to help me. Lo and behold I got so many reactions from my friends.  I found out that the tagalog term is Balingkikng; Tahitian Gooseberry in English.  


I brined it just the way I remember eating the fruit when I was younger.  I filled up a bottle with water, added some salt and poured the gooseberry in. After a day it was still very sour, so hmmm Why not use it as o souring agent for a soup base?  came an idea in my head...


And voila, that was how this dish called Crispy Sinigang sa Bangkiling (Crispy Pork Belly Soured in Tahitian Gooseberry) came about. The dish was sensational. I cooked it over and over for the time I was there.  My family couldn't resist the crunchy, crispy pork belly punctuated with a sour soup.  The vegetables also made this a one pot meal that delighted everyone.


Crispy Sinigang sa Bangkiling (Crispy Pork Belly Soured in Tahitian Gooseberry)
Ingredients:
3 lbs. pork belly strips
2 pcs. radish (thinly sliced)
2 pcs. eggplant (thinly sliced)
1 pack okra
3 medium tomatoes
2 pcs. onions (quartered)

2 cups extracted tahitian gooseberry ( you could use other souring agents such as tamarind)
fish sauce (optional)

Other vegetables that you could add on include: taro, bokchoy and chili to give this dish a kick.


First let's extract the gooseberry juice.  In a stockpot, boil 2 cups of tahitian gooseberry submereged in water.  Cook until the meat falls off from the seed.  Now mash the gooseberry and extract as much juice from it.  Use a strainer.  Discard the seeds and pulp and set aside the juice.  

Now in a pot, boil rice water (water used for washing rice) onions and tomatoes.  Add the pork belly strips.  Cook until tender.  Add the vegetables and the extracted juice from the gooseberry.  You may want to add a small amount first then see from there.  Season with fish sauce or, if unavailable, with salt.

To make the pork belly crispy, you must set aside the pork belly, pat dry and deep fry the strips. For healthy options you could bake the pork (or use turbo broiler) until the pork becomes crunchy and crispy.  Slice the strips into serving cuts.  Serve the pork with vegies and soup on the side... 


Enjoy!

Tuesday, January 3, 2012

Ginataang Halo halo

Fresh starts... second chances... clean slates. I love what the New Year represents. 

That was the Facebook status of my friend Agnes that I came across this morning. I thought that this status would be a good way to start my first post of the year. No matter what your personal goals are, no matter how many times you've tried and failed, the New Year allows you another chance to make it right.

The New Year also allows you to look back on the year that has been. Yes, I am truly grateful for what 2011 brought me. With 92 blog posts, I think I have outdone myself more than the previous years of sharing stories and recipes from my kitchen. I look forward to sharing even more this coming year... and hopefully you are still there with me every step of the way. 

As I thought about my first post this year, I thought of giving you the "circular dish" stamp just like in the previous years. Having said that, I would like to share with you guinataang halo halo, a dessert/merienda (snack) simmered in sweet coconut milk.  So let's start off with something sweet and sticky, rich and creamy as we say hello to 2012!  

Happy New Year friends! I hope the New Year gives you more reasons to gather and celebrate around the table... Cheers!


Guinatang Halo-halo
This may be served either warm or cold.  But since it's winter, a warm bowl between your hands will be as soothing as biting into a warm sweet pillowy soft sweet rice dough... enjoy!

Ingredients:
3-5 cans of coconut milk (I used a lot of coconut milk to give a thick sweet coconut soup)
2 medium size sweet yam, cubed
2 medium size taro , cubed (you could also use purple yam)
1 cup sweet rice flour (add water to form a dough, then make marble sized balls out of it)
1 cup tapioca pearls (to cook it perfectly)
3 pcs saba (bananas) cubed
1 bottle of sweetened jackfruit, shredded
2 tbsp vanilla
1 cup sugar (adjust sugar according to taste)

Procedure:

Pour  cans of coconut milk (reserve half a can for later) in a stock pot over medium heat. Let it simmer.  Once it simmers, add sweet yam and taro. Cook it for about 10-15 minutes. Then  you may add the round rice flour dough and cook it for another 5 minutes.  Add ttapioca pearls and jackfruit.  Stir the pot until cooked. Pour the remaining coconut milk for a creamy texture. Add sugar according to taste.  I used about 3/4 of a cup but you may add more if you'd prefer a sweeter blend. (optional: add vanilla flavor)

Now you are ready to have a comforting bowl of goodness!

Thursday, December 15, 2011

Pan De Sal (Filipino Bun)

I'm glad you enjoyed the first baking lesson I posted, which I also enjoyed learning from my aunt, Nana Ming.  Now if you missed the first lesson I suggest you scroll down to the previous post and check out Nana Ming's Classic Custard Cake.  It is definitely worth checking out.

For our next lesson, Nana Ming shows us how to make pan de sal (Filipino Bun).  Pan de sal is very much a part of a Filipino breakfast meal or merienda (mid-morning or mid-afternoon meal).  You could have it plain, to dip it in your coffee or tsokolate (hot chocolate) or as a sandwich, the sweet roll filled with your favorite sandwich filling. 


I'm sure most Filipinos have their own pan de sal favorite:  Some spicy Spanish sardines on pan de sal during a rainy day maybe?  Or condensed milk (which is finger-licking good) between the pandesal on a lazy Sunday afternoon... oh how about the soft pan de sal with creamy luscious macapuno ice cream, especially good on a hot summer day.


This versatile bun is sold in every corner bakery in the Philippines. The fresh rolls are packaged in a brown bag, and the scent of freshly baked bread that sneaks out from the bag is delightful. What makes our Filipino bun different is the crusty and powdery top, while at the same time having it soft and fluffy on the inside. And when it's warm and freshly baked... ahh it's definitely like a hug from home.

Before I share with you the recipe, let me thank Nana Ming for sharing it and thanks to my cousin Gigi too.  Gigi actually sent me the video taken during the actual lesson, a portion of it I'm sharing below.  Thank you Gigi for painstakingly recording  and sending me the clips part by part.


Nana Ming's Pan De Sal
Let's get ready with our ingredients.  I grouped and labeled the ingredients together to avoid confusion.  But no worries you'll have hot pan de sal in no time.
    For the yeast mixture:
            1 tbsp of dry yeast
            1 1/3 c (316 ml) luke warm water
            1 1/2 tsp (7.5 ml) sugar
   Then for the milk mixture
             2 eggs
      1/2 cup ( 118 ml) warm milk

Flour mixture 
     3 1/2 cups (480 grams) all purpose flour (unsifted)
     1/4 cup (32 grams) sugar
      1/3 (43 grams) cup melted butter

 Additional Flour Mixture
1/4 (32 grams) cup bread flour
 1 tablespoon(10 ml) melted butter

Bread Crumbs
1/4 (32 grams) cup bread crumbs

Mix all the ingredients of the yeast mixture and leave it for 5-8 minutes.
In a bowl, mix the eggs and milk.  Check the yeast mixture, if the yeast mixture has bubbles
then the yeast is active.  If there are no bubbles, repeat procedure number 1.

Add the yeast mixture and the second and third group together.  Mix well.
Gradually add the addition flour mixture to the well kneaded dough.
Cover the bowl and place it inside a pre heated oven 180 deg. for 30 minutes.

Divide the dough into 2 balls.  Roll each piece into a log.
Slice it diagonally into 8-10 slices for each log.  Slice a little dent on top.  Slightly drench it
with bread crumbs. I suggest you watch the video below:


Arrange the bread in a  pan.  

Leave the pan for another 30 minutes inside the warm oven (180 degrees F).

Bake for 12-15 minutes at 350 degrees F.


Re-create the pan de sal moment at home... it will surely define a happy breakfast meal.


For my next post, I will share with you what's on that tiny cup beside the basket of pan de sal... til my next post!

Share this thru:

LinkWithin

Related Posts Plugin for WordPress, Blogger...